

Raspberry Pi Beginner Projects: Putting The Hardware Together
<< Previous
First
2
3
4
5
6
7
8
Last
Next >>
Raspberry Pi Beginner Projects: Setting Up Raspberry Pi Beginner Projects: Parts List Raspberry Pi Beginner Projects: Putting The Hardware Together Raspberry Pi Beginner Projects: Raspbian Operating System Raspberry Pi Beginner Projects: Updating Raspbian Raspberry Pi Beginner Projects: Installing VNC Raspberry Pi Beginner Projects: Using SSH and SFTP Raspberry Pi Beginner Projects: Give your Pi a name Raspberry Pi Beginner Projects: Making The File System Visible
Putting together the kitWhen I came to write this page of the Pi setup I considered drawing a diagram to show how the board should be connected to the hardware. But connecting the Pi B+ to display, keyboard, mouse and power is so simple that I couldn't justify a new illustration. It just would'nt add anything to the discussion. So I'm just going to refer to the picture below and describe in words how to plug it all together.
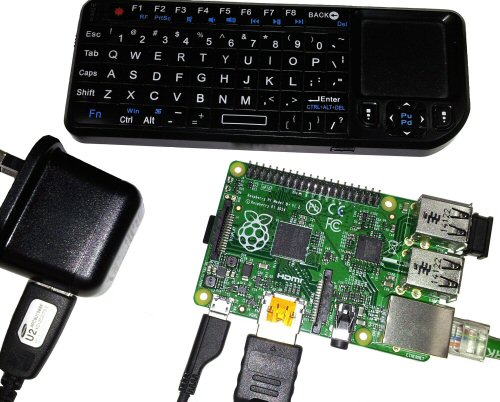
Keyboard and mouse or touchpadThe B+ has four USB sockets stacked 2-up and lined up next to the ethernet socket on the right side of the board. You can plug any wired USB keyboard and mouse into two of the sockets or you can use a wireless mini-keyboard like I have. I bought a wireless mini keyboard with a built-in touchpad because I thought that it would go well with the Pi. It's not that much bigger than the Pi itself and it only takes up one USB socket. As a bonus it even has a built-in laser pointer which can come in handy if you ever have to do any presentations. It really doesn't matter what kind of keyboard and mouse you use for the Pi because once you have it set up you can run it all remotely from your PC. I've hardly used the keyboard and mouse or the display since I got it all running smoothly. TV or monitor displayThe Pi has digital HDMI and a composite video and audio output. You can use either as the console to your RPi. I used the HDMI connection with a Monitor. The HDMI provides digital audio along with the video. My monitor has no speakers but that isn't important to me at this point. The HDMI port is located on the long side of the board opposite to the 40 pin GPIO connector. You can see it at the bottom of the picture above. If you don't have an HDMI TV or monitor then you can use the composite audio/video available from the jack socket between the HDMI and Ethernet sockets. Power supplyThe power supply connector is a mini USB socket on the board to the left of the HDMI port. You need to use a 5V supply rated at least 1.5A. The PSUs recommended for the B+ are generally rated at 2A so you should plan to use one capable of at least 2A. When I went shopping for a PSU there wasn't one specifically recommended for the B+ available so I went with a general purpose one with a standard USB socket. I then used a USB to mini USB lead that I had from a previous phone. This turned out great and I now have a 2A 5V power supply that I can use for other things if needed. On the next page I show you how to download and set up the Raspbian OS on a micro SD card.
<< Previous
First
2
3
4
5
6
7
8
Last
Next >>
Raspberry Pi Beginner Projects: Setting Up Raspberry Pi Beginner Projects: Parts List Raspberry Pi Beginner Projects: Putting The Hardware Together Raspberry Pi Beginner Projects: Raspbian Operating System Raspberry Pi Beginner Projects: Updating Raspbian Raspberry Pi Beginner Projects: Installing VNC Raspberry Pi Beginner Projects: Using SSH and SFTP Raspberry Pi Beginner Projects: Give your Pi a name Raspberry Pi Beginner Projects: Making The File System Visible |
| Now subscribe to our newsletter and don't miss a thing |
|
|

You should assume that there is an affiliate relationship and/or another material connection to the providers of goods and services linked to on this page and that we may be compensated when you purchase from a provider. Homediyelectronics.com is a participant in the Amazon Services LLC Associates Program and the Amazon EU Associates Programme, an affiliate advertising program designed to provide a means for sites to earn advertising fees by advertising and linking to amazon.com and amazon.co.uk.
Copyright © 2013 - 2024 homediyelectronics.com |
Legal |
Contact me |
Feed |
Google |
Site Map
Comments
No comments yet.Add Comment