


Arduino Distance Sensor Part 2 Code Description
Arduino Distance Sensor Part 2 Code sketch descriptionClick to get the full project details by subscribing free to HDE Magazine and never miss a project. SetupLittle has changed in the setup() function apart from calling setup_display_cm_mode() to set a known mode at reset time. Loop()After setup() has done it's work the system calls the loop() function. Loop() is executed in a loop (funnily enough) until the board is reset or powered down. Two things are handled in the main loop function:
This is what we might call the "user interface" because it takes our commands via the keypad and shows us the results on the LCD display. The keypad do_button_input() function is called every 50mS to make sure that no key presses are missed and to filter out any false clicks. More about that later. Every 500mS the display is updated by calling one of the display functions depending on the "display_mode" in use. The display mode can be changed by clicking the Select button.
Display setup functionsFollowing the main loop in the sketch are various functions designed to help in setting up the display and switching between modes. These functions are used to clear the display, create and load the special LCD characters and draw scales on the display where appropriate.
Histogram displayThe histogram display routines are unchanged from the previous version. A special character is selected for each of the 16 positions depending on the corresponding value in the rang_hits[] array.
Display in centimetresThe new display_distance_cm() function prints a label and the centimetre value on the bottom line of the LCD. After limiting the value to three digits to ensure that it doesn't overflow the line, the label "Distance" is printed followed by the value and units. The remainder of the line is then filled with spaces. This can be one, two or three blanks depending on the value. The range value is tested to determine if it consists of one two or three digits and the spaces applied accordingly.
Horizontal bar displayThe new display_line_distance() function is responsible for rendering a horizontal bar with a length proportional to distance. This time the range value is limited to 320 cm. giving a convenient 20 cm. per character. Generating the horizontal bar requires us to treat the final character differently to the others. This is because each horizontal pixel corresponds to 4 centimetres and so the final character may be anything from zero to 5 pixels wide. So the first thing to do is work out how many horizontal pixels we need to illuminate then we can calculate the full character count and the value of the part character. To do this we need to divide the range in cm by the maximum range, 320 then multiply by 80 which is the total number of horizontal pixels. (Range_cm / 320) * 80 BUT if we do the above calculation exactly how it's written we will not get the correct answer due to rounding errors in the integer maths. If range_cm is less than 320 then the answer will always be zero. To fix this problem we rearrange the calculation to make sure that the multiplication is done first like this: (Range_cm * 80) / 320 This time we divide a large number into a smaller one and we get the answer we want. Now that we know how many full characters we need they can be filled by writing special character 5 into the display in a loop. The value for the character on the end can be calculated using the "%" or modulus operator. It's similar to the division operator except that it returns the remainder of the division. part_char = range_px % char_px_length; The 'part_char' is then used to determine which special character to write into the end position. Printing spaces in the remainder of the line completes the bar display.
Reading the keypadThe designers of the Keypad/LCD shield have been careful to allow maximum flexibility by using only one I/o pin to read all 5 buttons. The buttons are wired to a series of resistors to generate a specific voltage for each key pressed. This voltage is applied to a single analogue input pin of the Arduino. The downside of this arrangement is the fact that all resistors vary slightly in their value and so will the voltage that feeds them. This means that there will be small measurement differences between different boards which may mean that measurement values that work on one board will not work on another. Don't worry though because this simply means that you may need to calibrate your keypad. It will only need to be done once. The function that reads the keypad is read_LCD_buttons() and I've left in a line of debug which sends the value read from the keypad to the serial monitor when a key is pressed. If you need to calibrate your board then uncomment the debug line and fire up the "Serial Monitor" from the "Tools" menu. Press each key in turn, note the value displayed and add 50 to it. Then adjust the values in the function, reload the code to the Arduino and you should be good to go.
Debouncing the buttonsWhenever there are mechanical switching contacts involved in a circuit you need to be aware that there will be some bouncing going on. When you press a switch it typically causes two metal contacts to collide to make a circuit. Ideally the contacts would meet and stick to make a clean switch but this is rarely the case. Mechanical switch contacts tend to bounce off each other when they collide. This means that the circuitry connected to the switch may see the circuit being made then unmade over and over until the switch settles down to rest. The extent to which a switch will bounce varies from switch to switch but typically it can take 10 - 50mS for the contacts to come to rest. There may be multiple transitions between key up and key down registered by the circuitry but in reality the button has only been pressed once.
InterferenceExternal interference can be a problem for switch inputs too. I have a shredder positioned close to a TV and when the shredder motor is powered up the picture on the TV breaks up. This is caused by electromagnetic interference from the shredder being picked up by the TV. Your Arduino could just as easily pick up these interference spikes and make the processor think that a key has been pressed. Switches can be hardened to interference and debounced using external hardware but I prefer to use a simple software technique whenever possible which is almost every time. I have to say here that no amount of software can eradicate interference or stop a switch contact bouncing. It can only mask the effects that these phenomena cause. Hardware engineers may insist on putting in extra circuitry to deal with the problem arguing that it is a better approach as it applies the fix closer to the problem. They are not wrong but I put in the software solution anyway because frankly, the hardware guys don't always get it right and it's much easier to fix the software once a product is in production. So what is the software solution? 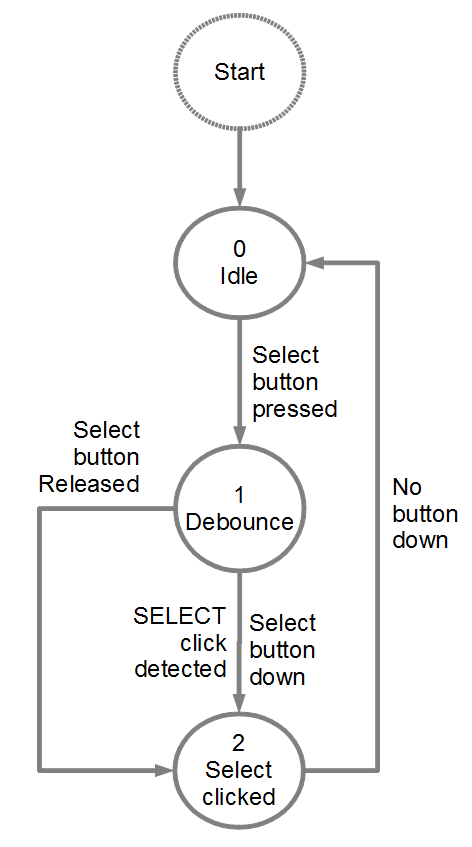
Finite State MachineIt sounds grand doesn't it? It isn't. It is a very simple way to break down large tasks into several smaller ones which are easier to solve however. Debouncing a switch is a small problem to start with so our state machine is also going to be small but useful nevertheless. The first thing that I do when designing a state machine is to draw a state diagram and here below is the one I drew for the key debounce. The circles are the states that the software can be in at any one time. The lines between the states show how the machine transitions from state to state and the text on the lines indicates the action that is taken when moving between the states. This state machine is implemented in the function do_button_input() with each state corresponding with a "case" in a switch statement. There are many ways to implement state machines but this is the simplest method that I have found for small tasks like this one. There are 3 states. We don't count the "Start" state as that just shows us which state to initialize the machine in at start up. In order for this and most other state machines to work effectively it needs to be called frequently. This one is called every 50mS from the main loop() function.
How it worksThe first time that do_button_input() is called it initializes into state 0 where it tests for the Select key being pressed. The state variable is declared as static so that it is only initialized once and will hold it's value between calls. If the key has not been pressed then nothing happens and the routine returns. If the Select key is detected then the state is changed to 1 before returning. The code for state 1 will be run the next time the function is called. State 1 is the debounce and interference filter state. A valid keypress will only be registered if the key is detected on 2 consecutive calls or 50mS apart. If the Select button is not down while the machine is in state 1 then the state is advanced to 2 with no action taken. This effectively filters out any signal shorter than 50mS. If the Select button is still down in state 1 then the machine moves to state 2, the display mode is changed and the new display mode initialized. State 2 waits for the button to be released before transitioning back to idle state 0. This prevents any unwanted auto-repeats of the keypress and ensures a 100mS wait after detecting an interference pulse. Well that worked out well. I do like using state machines. They have made my life easier time and time again. The code sketch for the distance sensor project is available here. |
| Now subscribe to our newsletter and don't miss a thing |
|
|

You should assume that there is an affiliate relationship and/or another material connection to the providers of goods and services linked to on this page and that we may be compensated when you purchase from a provider. Homediyelectronics.com is a participant in the Amazon Services LLC Associates Program and the Amazon EU Associates Programme, an affiliate advertising program designed to provide a means for sites to earn advertising fees by advertising and linking to amazon.com and amazon.co.uk.
Copyright © 2013 - 2024 homediyelectronics.com |
Legal |
Contact me |
Feed |
Google |
Site Map
Comments (1)
Add Comment