


Arduino Distance Sensor Part 2
How to build an Arduino Distance Sensor Part 2Click to get the full project details by subscribing free to HDE Magazine and never miss a project.
In part 1 of the Arduino Distance Sensor Project we wired up the three components of the distance sensor and loaded a simple Arduino sketch to produce a display on the LCD. This time I'm going to show you how you can add more display modes and switch between them using one of the keys on the keypad. If you haven't yet built the hardware then follow the instructions in part 1 and load the new sketch that you will find later in this article.
OperationOnce you have downloaded and run the new sketch you can switch between the three available display modes by clicking the SELECT key on the keypad. That's all there is to it and once you understand how the code works you should be able to add modes of your own.
SoftwareThis is where the magic happens... You might find it helpful to print the sketch from here to help you follow along with this description. The code sketch contains a lot of comments that I hope will be of use to you when figuring out how it works. In an effort to keep this explanation as simple as possible I'm only going to describe the parts of the code that have changed since the last revision described in part 1. The Arduino Distance Sensor project is upgraded with motion detection capability in the latest edition of Home DIY Electronics Magazine so register and claim your copy now. Starting at the top of the sketch the first things that has been added are some definitions of constants that are used to signal which button has been pressed. These are constants that begin with 'btn' like 'btnRIGHT', 'btnUP' etc. These constants are each assigned a value and it means that we can use a meaningful name in the code instead of the number itself. Now that we have more than one display mode we need a variable to keep track of the mode. The variable 'display_mode' is declared and initialized to 0.
Special charactersLast time we defined the special mini bargraph characters as arrays of bytes. There was a character with just the bottom row lit with pixels and seven more characters each with one more row populated than the previous character. The new software defines six more characters that are used to form the tip of the horizontal bargraph. This time progressive columns of pixels are populated. The LCD module only allows up to eight special characters to be loaded at any one time. This means that we can't use both sets of characters at the same time. We can swap them in and out on the fly though. Provided we don't try to display both sets of characters on the display simultaneously we can load them up as we need them. |
| Now subscribe to our newsletter and don't miss a thing |
|
|

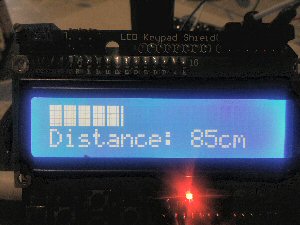
 Mode 0: The histogram style display from the original sketch on the top line with the distance in centimetres displayed on the bottom.
 Mode 1: This is the original display
mode from part 1 of the project.
Mode 1: This is the original display
mode from part 1 of the project.
 Mode 1: A single horizontal bar to graphically represent distance to the object with the value on the bottom line.
You should assume that there is an affiliate relationship and/or another material connection to the providers of goods and services linked to on this page and that we may be compensated when you purchase from a provider. Homediyelectronics.com is a participant in the Amazon Services LLC Associates Program and the Amazon EU Associates Programme, an affiliate advertising program designed to provide a means for sites to earn advertising fees by advertising and linking to amazon.com and amazon.co.uk.
Copyright © 2013 - 2024 homediyelectronics.com |
Legal |
Contact me |
Feed |
Google |
Site Map
Comments (1)
Add Comment